My Blog List

Sunday, November 29, 2015

Polar Express Christmas Party

Last Christmas we headed up the decorations for the Christmas party at church.  The theme was Polar Express.  What fun we had with the decorations albeit, very time consuming!
Here you can see the train and the track.  The red in the background is the tunnel.  We had the food  tables as part of the train behind the engine on the track.

 The overall view, but blurry unfortunately. We used lots of paper!  Paper snowflakes and paper tree decorations on the tables.

This was my favorite part...Tomato cage Christmas trees that blocked the tunnel entrance to the North Pole.  I made a sleeve to fit over the tomato cages and then hot glued strips of fabric to the sleeves. The tunnel was made from pool noodles, PVC pipes and red plastic table cloths. 
Through the tunnel, the kids arrived at the North Pole where they found crafts and a visit from Santa.

Friday, October 18, 2013

Mosaic House Numbers


I've been wanting mosaic house numbers for a while now.   My MIL figured out the procedure!  Unfortunately, I didn't learn the entire process well enough to give many details.  I chose a font I liked and printed it the size we wanted.  We used the print-outs as templates to lay out the glass on.  Then we used a mesh to glue the numbers on. Then mortar. They are mosaicked right to the house. 

Sunday, April 7, 2013

Rag Quilt #2


The first quilt was fun and fast enough that I had to try my hand at another.  This one will go to the school auction.  Hopefully someone will like a Paris theme. :) 

Wednesday, February 6, 2013

Rag Quilt

My first rag quilt!

Tuesday, November 27, 2012

Party Favors

Easy, fun, colorful party favors!
 
Drill gumballs and put on a lollipop stick.  Wrap and tie. 

Monday, November 26, 2012

Pig Out on Personal Progress

We had a year of "Pigging Out on Personal Progress".  I made each of the girls a Personal Progress Piggy Purse to carry their personal progress in that they received at New Beginnings. 

At New Beginnings, I told my own story of the 3 Little Piggy Princesses.  One was foolish and didn't do personal progress, the 2nd a little smarter and the 3rd was dedicated.  I made piggy houses as a visual.  The first house I smashed as I told the story.  The second one I tore.  The 3rd one had cement in it and it was solid and strong.  (I forgot to take pics of the houses before they were destroyed.  The cement house is the larger house in the picture...it survived the storm!)  As I did interviews with the girls, I gave them each a smaller house that was filled with candy.
These are other interview goodies.

 As an incentive, I baked goodies when the girls had completed personal progess.  These picks went in brownies.
And piggie ice cream cone cupcakes.
 
 I often forget to take pics so I don't have visuals for everything but we also had a "pignic" just before summer.  I used brown paper lunch sacks and put in some cut out paper food that had goals on it for our summer pig-out, plus some candies.  I told my own story of "If a Young Woman Pigs Out on Personal Progress." I also made the girls pig rings to wear to help them remember to do their personal progress. These were tied on to the pignic lunch sacks.
 
We had a county fair for Young Women in Excellence to finish off the year.  We talked about Wilbur, from Charlotte's Web, being an ordinary pig but how really he was extraordinary.  I made ribbons to present to the girls that said: "Some Pretty Icredible Girl" (Some PIG)
I hope this helps someone somewhere, which is why I post it.  :)
 

Sunday, October 21, 2012

Doll House

We made a doll house out of a book shelf for my daughter's birthday.  It has scrapbook paper + mod podge for walls.  Popsicle sticks were used for the window frames.


 And we managed to make a few items of furniture as well.  A cute little bed! 

 
My son had the awesome idea of a mini I Spy table.  We used a pink lid that I found as our table top.  For the base I paninted a spool from embroidery thread.


Monday, February 20, 2012

Scrappy Ruffle Bag

I love using up scraps because I can't seem to throw fabric away. Especially when the scraps can become something like this bag! Loving it!

Monday, January 9, 2012

Kitchen Bridal Shower Cake

This was made for a favorite babysitters' bridal shower. The cake stand was on the bride's wedding registry. I made 4 placemats and coasters in her kitchen colors and monogrammed 4 napkins. I also monogrammed 2 kitchen towels to be wrapped in the cake. I needed something to go in the middle of the cake to give it more of a base. I found that a roll of toilet paper was just the right size. So I monogrammed it too and stuck it in the middle! Ha! Add ribbon and flowers.

Sunday, December 4, 2011

Advent Countdown

Advent calendars are such a hit with kids anticipating the excitement of Christmas Day! I wanted to make a simple countdown calendar to give to friends and neighbors. It had to be simple so that we could mass produce them. After sleepless nights tossing ideas around in my head, this is what we ended up with:
We cut brown wrapping paper 4"x 36" and wrapped 12 candies into it tying them off with fabric strips that I cut 1/2"x 6". I got wrapping paper that had the grid on the back so that it was easy to cut it to size. I decided to make the advent for only 12 days before Christmas since we were making so many of them. The poem that will be attached reads:
Start this advent on December the 12th,
Each day untie a treat for yourself.
When the end of the chain draws near,
You will know that Christmas is almost here.

Saturday, October 15, 2011

I Spy Table II

It was so much fun making the first I Spy table that I wanted to make another, smaller one. I am pleased with how it turned out. I found a simple side table at Goodwill for a few dollars. Then came white spray paint and the trim on the edge of the table. Since this one is so much smaller than the first and because I knew what I was doing this time, it turned out with even more of a spying challenge.

We had our fun with it and then gave it to the school to be auctioned off. I don't know who won it or how much it went for but hope that it is being enjoyed by someone, somewhere.
P. S. I Spy Waldo. (As in "Where's Waldo)

Wednesday, July 6, 2011

From Nasty to New

The nasty old high chair cover had to go!
Good-bye!
The new and improved high chair cover is BRIGHT!
But wait, there's more! It's reversible!

Thursday, June 16, 2011

Inspired by ikatbag

I wonder if I was ever so inspired before the internet came along. I glean so many ideas from looking at everyone's projects. This one comes from ikatbag. My sister approached me about making it a combined project, which was perfect. She is more paper and I am more fabric. Take a look at the finished result.


I wish I would have had a little more experience doing a zipper closure. I can see how it would be so much better now that I have all of the bakery items in their jars. And the verdict? My kids love it!!! Even the older ones that I thought would likely be less interested. Thank you ikatbag!

Saturday, May 28, 2011

Paper Mobile

I have always loved hanging things! It gives a room more demension. Pottery Barn for teens had a mobile a while back that inspired this:


Paper and strings make pretty things.

Thursday, March 31, 2011

Teacher Doors 2011

It's time again for teacher appreciation week at my kids school. I was assigned 2 doors to decorate. The decorations are in mint condition on my floor. Now to transport them to the school doors...hmmm. First is one for the 4th grade teacher. It is made from wrapping paper, bright colored paper and plenty of glitter. This one is for the librarian's door. I used paper and felt to create the finished product.
It was sure fun to create these door hangings but I am sure glad they are done too! On to the next project!

Sunday, January 9, 2011

Valentine Topiary

Last year I wanted to make the ladies I visit a Valentine's Day gift. Here's what they got:
I used broken toothpicks to stick gummy candies on to styrofoam balls which I had painted pink. I used more painted styrofoam balls in painted clay pots to stablize the topiary. Long popsicle sticks worked perfectly to bring it together. Everything is better with a bit of tulle! I found most of the gummies at Walgreens with some gummy frogs and mushrooms from World Market. Sweet to eat!

Saturday, December 11, 2010

Ginormous Stocking!

Merry Christmas! A few years ago, I thought it would be fun to make my kids some ginormous stockings. They, of course, love them! (I'm not sure that Santa has found the same love and respect for the stockings.) From top to bottom is 32 inches and across the top measures about 15 inches.
In any case, they were sew fun to make and hopefully the kids have some fond memories of them. (That's the point.) If I decide to discontinue their use, they would make great toddler sleeping bags!

P.S. Ideas for big poofy inexpensive kid stuffer-type things are most welcomed!

Tuesday, October 12, 2010

Shaggy Raggy Rugs

Remember me? It's been a while and it may be a while before I post again. I try not develop a serious relationship with my computer because I'd rather be crafting or doing the mom thing. kwim?

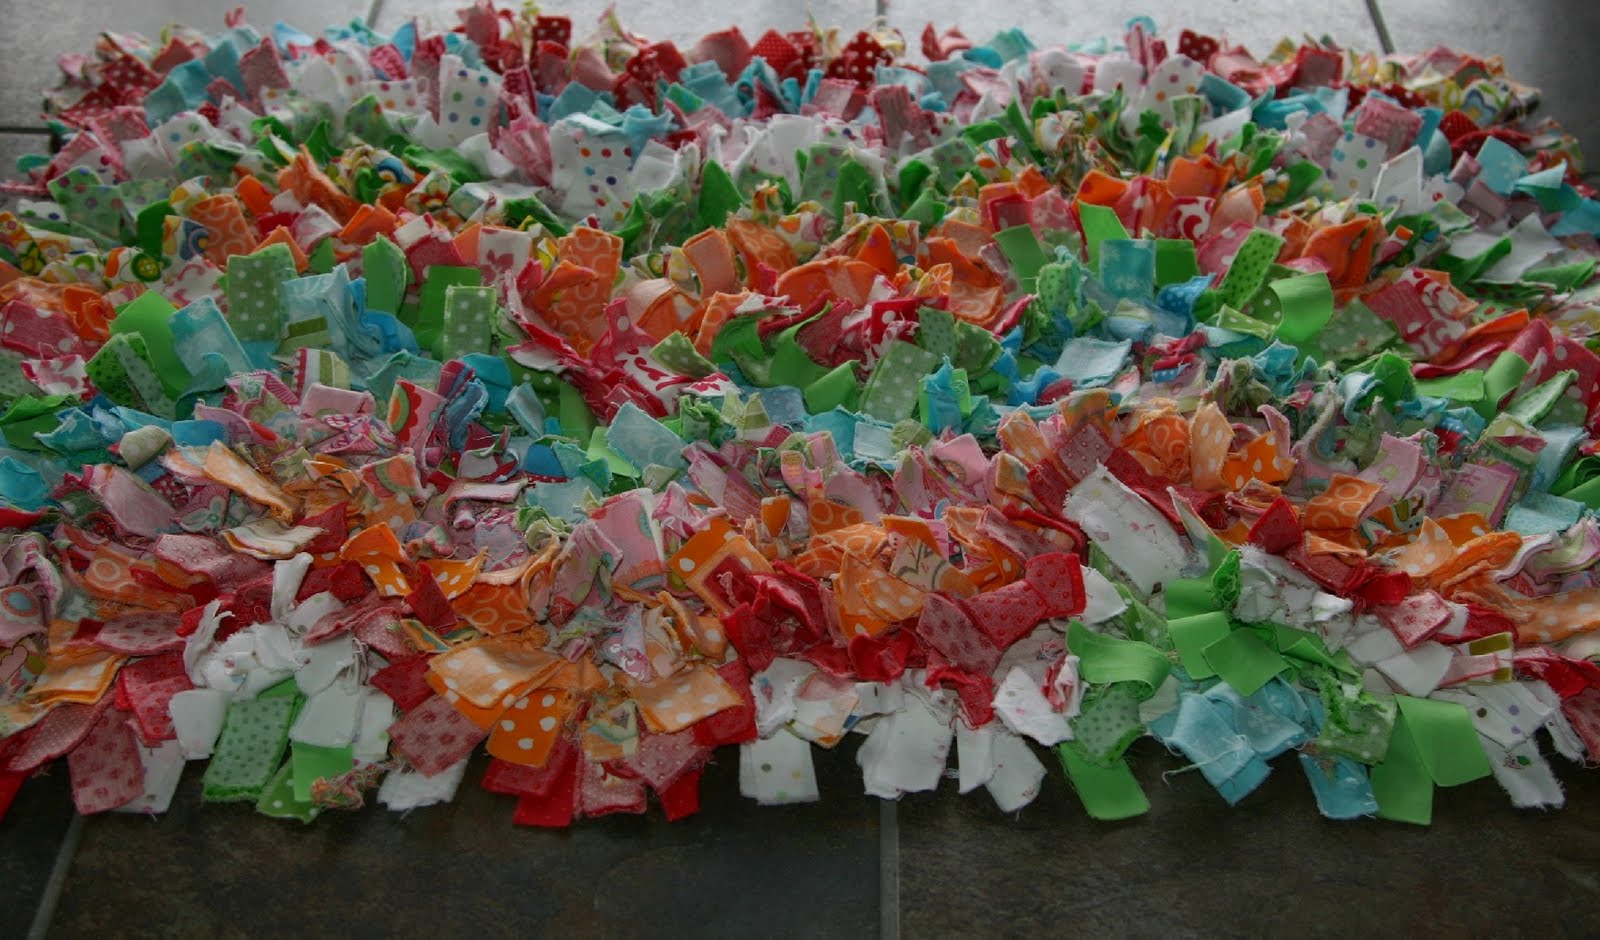
My grandmother used to make rugs. (wish I had a picture!) I saw one of her rugs recently that got the wheels in my head spinning. I came straight home and started cutting scrap fabric. The result was this:

Here's how to make your own. I used canvas for the back side of my rug. Cut canvas to desired size. You can serge the edges of the canvas or just turn them. I used a pencil to mark 1 inch lines all down the canvas.

Cut strips of fabric 1"x5". Fold the strips in half (short sides together) and press with fingers to make a crease to mark the middle. Overlap fabric pieces slightly with right side to canvas and sew them on the folded creases on to the marked lines. I place the fabric as I sew. I like to start from the middle of the rug and work my way out.

Machine wash and dry for raggy results! It's a great way to use up scraps!

Be sure to wash and dry for full fluffy effect!

Friday, July 30, 2010

Yet Another Princess Book

Every time I get finished with one of these books, I say, "Never Again!" And yet, I keep making them. And I have another book idea (a boyish one) nudging just waiting to be created. I think most of the time spent in these books is just thinking about how to make them work and trying to use things I have on hand rather than purchase fun new things which is most tempting! This one is very similar to the one I have posted previously but here it is:


It is so satisfying to have finished!

Thursday, July 15, 2010

Checkers!

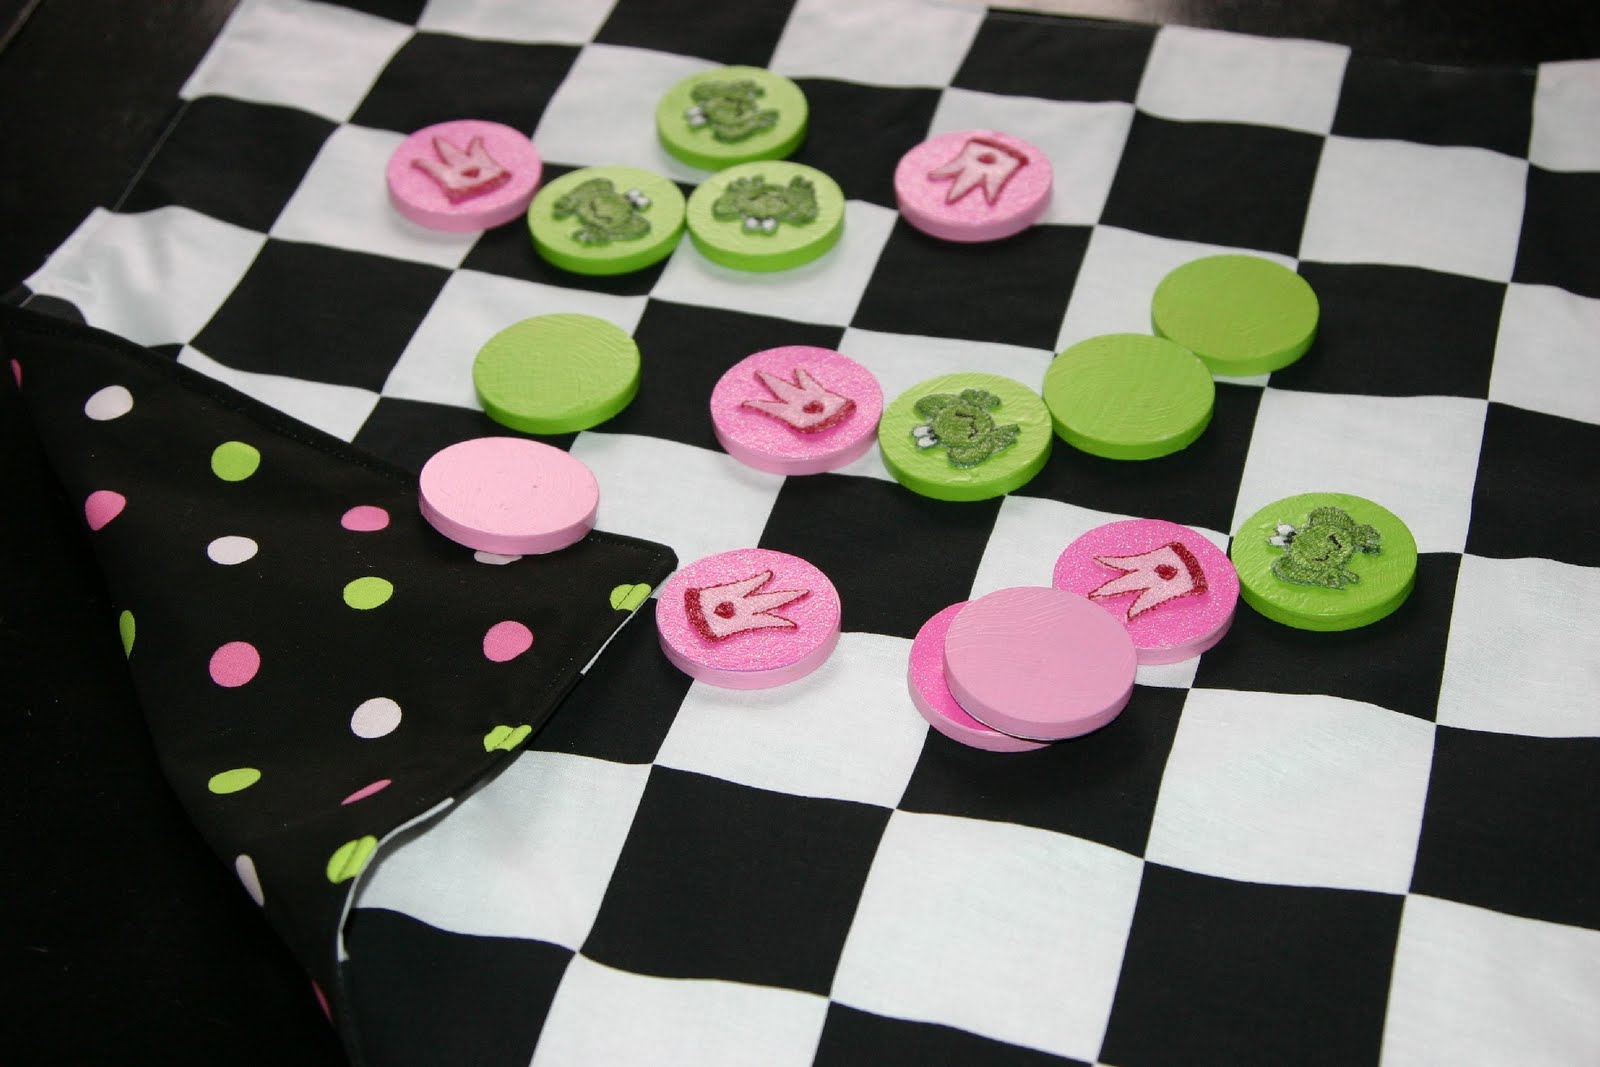
My daughter wanted a Checker's game for Christmas. I thought it would be fun to make our own unique set (which the kids have loved)! The one I made for the kids is an over-sized floor mat that I pieced together with fleece and felt. It has wooden stars for the game pieces and the whole thing was way too much work! :) However, I've made several sets since then after finding checkerboard fabric. Here are a few:
Alien invasion!
Mickey Mouse :)
Princess and the Frog!